Assembly:
- I clean mould lines pretty thoroughly and aggressively.
- I glue the models with plastic cement (Revell Contacta) or with plastic cement mixed with mould line / sprue shavings.
- Where gaps would be visible and undesirable, I use a lot of glue and after it dries, I shave off the excess plastic goo (where this is not possible, I fill the gaps with Green Stuff and / or Milliput).
- I drill gun barrels, 1 mm drill bit for (heavy) venom cannons, 2 mm drill for fleshborers, even larger one for deathspitters.
- After basing (see below), I wash minis in water + dish soap using a toothbrush.
Basing:
- I make Oyumaru moulds of some stones and create larger rocks from Milliput.
- I make smaller pebbles from Milliput.
- I glue big rocks to bases with superglue.
- For places where I want to have water, I use sand paper (500 grit, then 1000 grit) to smoothen the base surface.
- I cover bases with superglue, and sprinkle them with small pebbles and sand / baking soda mix.
PaintingPaints needed:Sprays: white with a smooth finish (Citadel White Scar), matt / satin varnish (Citadel Munitorum Varnish).
Acrylics: black (VMC Black, Scale75 Black), white (VMC White), warm off-white (VMC Pale Sand), dark red (VMC Dark Red), turquoise (VMC Turquoise), warm bright red (VMC Scarlet Red); sporadically: olive green (VMC Middlestone), brownish orange (Secret Weapon Orange Rust), tan (VMC Dark Sand).
Washes: light sepia (AP Light Tone), red (AP Red Tone), blue (AP Blue Tone).
Finish: gloss varnish (AP Gloss Varnish), matt varnish (AP Matt Varnish), blood effect (Citadel Blood for the Blood God).
No airbrush. Unless noted otherwise, every step is just 1 coat of paint. Unless noted otherwise, I use my paints with relatively thick "layer consistency" / "basecoat consistency".
I apply washes to the whole area (not just recesses). I use several washes at the same time. I don't mix them on the palette, but let them flow into each other on the mini.
Preparation:- I undercoat with Citadel White Scar spray (pretty heavily, so that even recesses are white).
- I basecoat the bases with warm dark grey (VMC Black + VMC Dark Sand), watery consistency (almost like a wash).
- I drybrush the bases with brighter grey (VMC Black + VMC Pale Sand).
- I drybrush the bases here and there with VMC Pale Sand.
- I toothbrush splatter diluted pale grey (VMC white + VMC black) and VMC Pale Sand (in any order, pretty heavily).
Reds, except vents:- I basecoat with purplish / brownish colour (VMC Dark Red + VMC turquoise, somewhat watery layer consistency. I can try mixing wet on wet on miniature to get more bluish shadows and more reddish highlights).
For later highlights, I use layering (stippling motions or feathering where necessary) or drybrushing:
- I highlight everything except the recesses with VMC Dark Red.
- when I need to blend red into white, I drybrush the border area with VMC Dark Red + VMC Pale Sand.
- I highlight with VMC Scarlet.
- (optional) I wash with AP Red Tone and AP Blue Tone (at the same time).
- (optional) I highlight with VMC Scarlet again.
- I spot highlight / edge highlight with peach colour (VMC Scarlet + VMC Pale Sand)
Whites, except teeth:- I wash lightly, mostly with AP Light Tone + VMC Glaze Medium, here and there with AP Blue Tone + VMC Glaze Medium and AP Red Tone + VMC Glaze Medium (all washes at the same time, letting them mix on the mini).
- I wash vents with AP Red tone (while doing so, I can also fix any areas that didn't get the wash by mistake in the previous step).
- I glaze highlight with VMC White + water. This takes several layers and maybe some feathering, depending on my patience. Brightest spots and edges can be painted with layering-consistency white.
- weathering: I stipple very subtly, here and there, VMC Black.
Bases:- I stipple very subtly, here and there, brownish orange (Secret Weapon Orange Rust).
- I stipple very subtly, here and there, olive green (VMC Middlestone).
- I paint water using loaded brush (diluted paint, VMC Middlestone + VMC Turquoise + VMC Black, flow marks are a feature, not a bug).
- I paint base rims black.
Claws:- I stipple or drybrush VMC Black (over white, at any moment after white was washed).
- I edge highlight VMC Black + VMC Pale Sand.
- (optional) I paint the second edge highlight with a brighter mix of VMC Black + VMC Pale Sand.
Eyes:
- I paint them with VMC black (after the surrounding area was painted and washed; don't paint the edges of the eye).
- I add a single spot of white paint.
Teeth:
(after the mouth was painted and washed:)
- I paint each tooth separately with VMC Pale Sand.
- I highlight with VMC White (or just paint them with one coat of white and forget Pale Sand).
Finish:- I lightly spray with Citadel Munitorum Varnish; wait for it to dry.
- I paint eyes and select fleshy parts with VMC Gloss Varnish (don't paint the edges of the eye).
- I use 2-3 coats of VMC Gloss Varnish on water on the bases.
- (optional) I add one more layer of white or black to the tips of horns, spikes, etc. to avoid paint damage, and then cover them with VMC Matt Varnish.
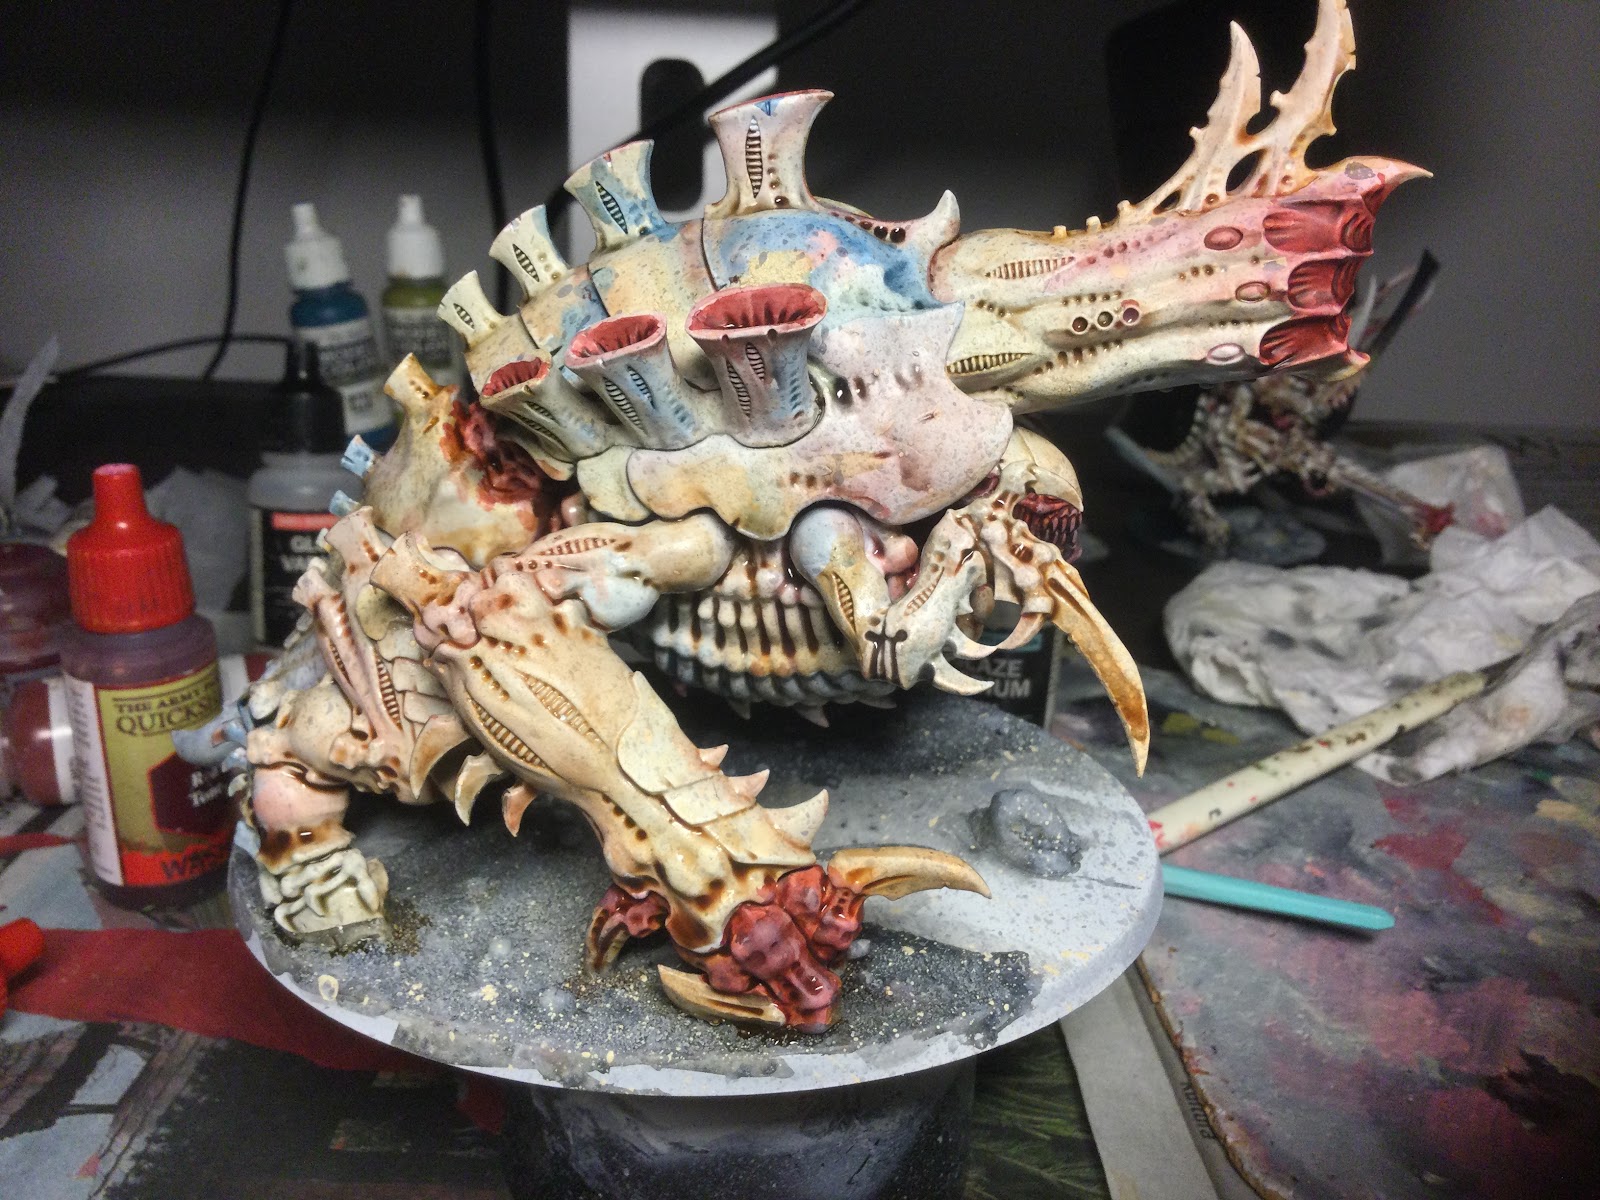
- I use Citadel Blood for the Blood God in the recesses around the spine and inside the chimney vents.